
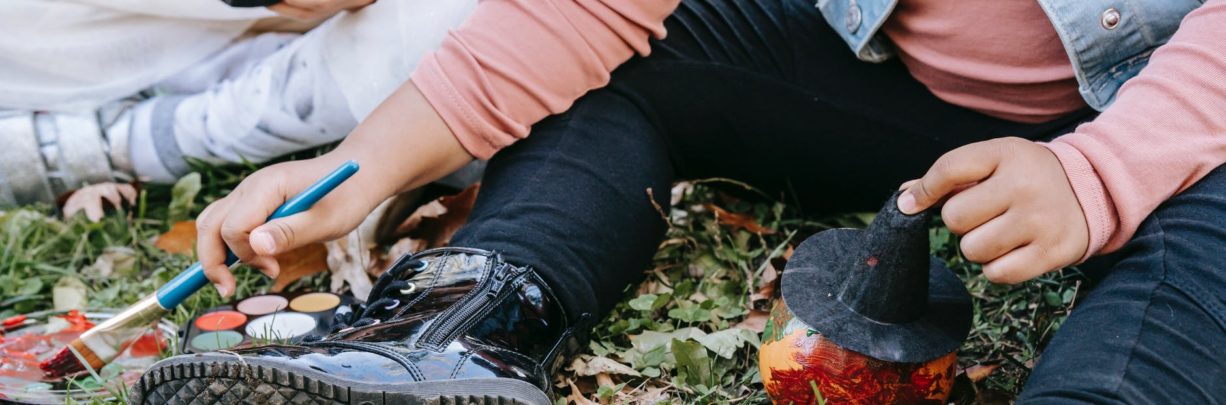
Are you ready for a spooktacular Halloween? Halloween is all about making memories from trick-or-treating around your neighbourhood with friends and family, to getting all dressed up, to picking out and carving the perfect pumpkin!
To help you make the most of your Halloween this year I have put together 5 bat-tactic Halloween games, activities and crafts for kids. If your kids love to get crafty or if you need a way to get some energy out indoors, I’ve include some super fun, easy and creative ideas to try with your kids this Halloween.
Mummy Wreath
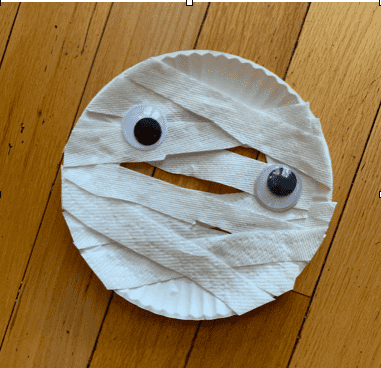
Supplies
- Paper plate
- Paper towel
- Scissors
- Glue
- Googley eyes
How to Make
- Grab a paper plate, fold it in half and cut out the middle to create a ring.
- Cut paper towel into thin strips.
- Glue the strips across the paper plate to create your mummy.
- Glue googley eyes on either side of the paper plate.
Bat Leaf Craft
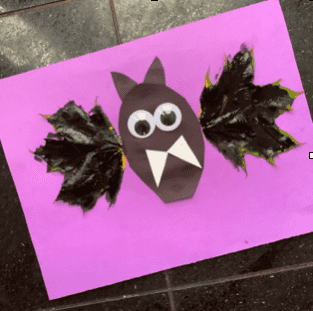
Supplies
- Two fallen leaves
- Washable black kid’s paint and brush
- Black, purple and white construction paper
- Googely eyes
How to Make
- Go outside and grab some Autumn leaves. Bring them inside and paint them black. Set them aside to dry.
- Take a piece of black construction paper and cut out an oval shape for the body of the bat.
- Cut out two small triangles for bat ears.
- Out of the white construction paper, cut out two triangles for bat teeth.
- Grab your purple construction paper and glue down the bat body in the centre of the page.
- Glue down the ears, googley eyes and teeth.
- Once the leaf bat wings are dry, glue them on either side of the bat body.
I never knew how much I loved making BAT crafts and activities with my kids!! They don’t make an appearance in crafts or activities at any other time of the year other than Halloween, but these so called rats with wings are pretty cool animals. Did you know that a Bat can live more than 30 years and can fly at speeds of 60 miles per hour?!? Who knew these little creatures had such longevity and speed!
Paper Bag Luminaries

Supplies
- Paper bags (white or brown. If you use brown paper bags you’ll need more tea lights)
- Battery operated tea lights or small flashlight
- Green, white and orange washable kids paint and brushes
- Black construction paper
- Scissors
- Glue
How to Make
- Grab three paper bags, paint one white (unless they are already white), another orange and the last one green. Set them aside to dry.
- Cut out a ghost face, jack-o-lantern face and a Frankenstein face.
- Glue the faces on to the bag using glue.
- Place a tea light inside each paper bag. (You may need to add two or three tea lights to get them to be brighter especially if you used brown paper bags.)
- Display!
Halloween Sensory Bin
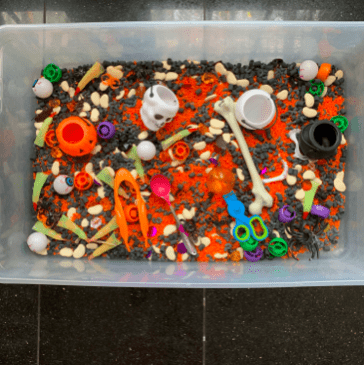
Supplies
- Sensory bin or sensory table and bins
- Orange coloured rice (see below for recipe)
- Black coloured pasta
- Lima Beans
- Eye balls
- Halloween Party Favors (halloween squishy toys, skeletons, fake fingers, fake teeth, fake spiders etc.)
- Skeleton bones
- Halloween candy holders (in the shape of a skull, ghost, pumpkin or witch’s cauldron)
- Green, purple, orange gems or squeeze bottle caps
- Spoons, scoopers and tongs
Supplies for Orange Coloured Rice
- 1 Cup of White Rice
- 1/2 tsp White Vinegar
- Several Drops of orange Gel Food Coloring
- Large Ziploc Bags
- Parchment Paper
- Baking Sheets or Tupperware containers
How to Make
- Combine the rice, white vinegar and food colouring in a Ziploc bag.
- Seal it carefully and mix the contents throughly.
- Repeat for each colour.
- Lay a sheet of parchment paper on a baking sheet or line a Tupperware container.
- Spread the coloured rice out on the parchment paper and allow it to dry overnight.
Troubleshooting
If you don’t have gel food colouring, regular food colouring will work fine. If you want your rice to be more vibrant add more than just a few drops of food colouring and a small amount of white vinegar. Although the instructions calls for 1 cup of rice I usually make between 6-7 cups of rice for a sensory bin.
Supplies for Black Coloured Pasta
Although the instructions calls for 1 cup of pasta, I usually make about 12 cups (about 1.3 kg) for a sensory bin.
Makes 1 cup (about 110 g) coloured pasta
- Large, resealable plastic bag, for mixing
- 1 cup (about 110 g) white pasta
- ¼ tsp hand sanitiser
- Several drops of gel or regular food colouring
- Spoon
- Baking sheet or large, shallow plastic container, for drying
- Parchment paper
- Airtight container or resealable plastic bag, for storage
How to Make

1. In a large, resealable plastic bag, combine the pasta, hand sanitiser and food colouring.
2. Seal the bag carefully and mix and massage the contents thoroughly to distribute the colour evenly. If you want your pasta to be more vibrant, add more drops of food colouring and a small amount of hand sanitiser.
3. Line a baking sheet or plastic container with parchment paper.
4. Spread out the coloured pasta on the parchment paper as thinly as you can, to help it dry faster. Allow it to dry overnight. As the pasta dries, use a spoon to carefully separate the pasta.
5. Repeat for each colour, drying each colour separately on its own baking sheet.
6. Ensure that the pasta is completely dry before storing it or letting your child play with it. This will help prevent colour transfer. Once dry, the colour on the pasta should not transfer, but as your child plays with it, there may be some transfer of colour onto their hands or clothing. Wear a smock or play clothing to help protect clothes and wash hands with soap and water to remove the colour.
7. Store the coloured pasta in an airtight container.
Note: Since this recipe uses hand sanitiser, adult supervision is required when using the pasta in sensory bins with children who still put things in their mouth.
How to set up the Halloween Sensory Bin
- Grab all your supplies and add them to the sensory bin.
- Add the orange rice on one side and black pasta on the other side.
- Add all the other items.
- Invite your little one scoop, pour and play!
Pin the Spider on the Web
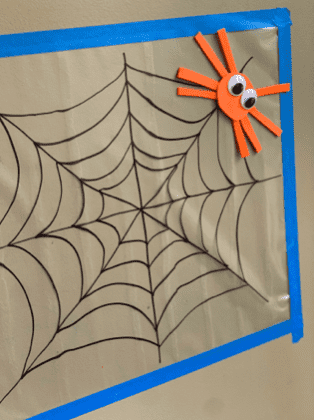
Supplies
- Contact paper
- Black sharpie
- Foam sheets
- Googley eyes
- Masking tape
- Glue
- Scarf for a blindfold
How to Make
- Grab your contact paper and cut off a square. Lay it down flat on the floor. Secure the corners with something heavy like a bowl or book.
- Take a black sharpie and draw a spider web on the translucent side (not the paper backing side.)
- Take your foam sheet and cut out a circle and eight legs.
- Tape the legs to the back of the circle.
- Glue the googley eyes to the front of the spider. Set it aside to dry fully.
- Putting Up Your Sticky Wall. Contact paper has one side that is very sticky so unrolling it and taping it to the wall can be a little tricky.
Here’s how I do it:
- Stick the sticky wall up on the wall using small rolled up pieces of tape in the four corners. Make sure the paper backing side is facing out.
- Peel the paper backing off to expose one small corner of the sticky paper. Continue peeling the paper backing off until one side is exposed. Tape that side down fully using Painter’s tape. This will ensure that it doesn’t fall down as your child is playing.
- Slowing peel back the remaining paper backing and tape down the other side.
- Remove the small rolled up pieces of tape from underneath the sticky wall. These rolled up pieces were just there to help you get the sticky wall set up and can be removed once your sticky wall fully up. But if you don’t mind them there you don’t have to remove them.
- Fully tape down your Sticky wall using painter’s tape.
How to Play
Blindfold your child and turn them around once. Place them in front of the web and invite them to try and stick the spider on the spider web. The winner is the person who sticks the spider the closest to the centre of the web. Give points depending on how close they get!


Leave a Comment
You must be logged in to post a comment.